How to Make Pictures Smaller in Powerpoint TUTORIAL
How to Make Pictures Smaller in Powerpoint
10 Strategies to Compress Images in Large PowerPoint Presentations
by Avantix Learning Team | Updated July 21, 2020
Applies to: Microsoft® PowerPoint® 2010, 2013, 2016, 2019 and 365 (Windows)
There are many strategies you tin use to compress images in PowerPoint presentations to reduce file size. It's common to use built-in pinch features in PowerPoint to make big files smaller just you lot can also reduce image size earlier you insert pictures on your slides. If y'all're using 365, 3D models can cause a significant increase in file size.
The post-obit are 10 ways to compress images in PowerPoint presentations:
- Compress pictures using Compress Pictures on the Ribbon
- Compress pictures when saving a PowerPoint file
- Change default compression settings in PowerPoint Options
- Insert pictures instead of copying and pasting
- Use image files at a lower resolution
- Convert images to a different file blazon
- Replace 3D models with 2D alternatives
- Save a re-create of images with picture effects
- Discard editing data
- Link to images
Note: Buttons and Ribbon tabs may display in a dissimilar way (with or without text) depending on your version of PowerPoint, the size of your screen and your Command Panel settings. For PowerPoint 365 users, Ribbon tabs may appear with unlike names. For example, the Picture Tools Format tab may announced every bit Picture Format.
To view file size in PowerPoint:
- Click the File tab in the Ribbon.
- Click Info. In the Properties area, file size is listed abreast Size.
Once you've completed the post-obit strategies, shut and save the PowerPoint file, reopen information technology and cheque the file size again. You tin also view file size in Windows 10 File Explorer or Windows Explorer in older versions of Windows.
Recommended article: PowerPoint Slide Show Shortcuts (fifty+ Shortcuts)
Do y'all want to larn more than about PowerPoint? Cheque out our virtual classroom or live classroom PowerPoint courses >
1. Shrink pictures using Compress Pictures on the Ribbon
One of the nigh common means to reduce file size is to compress one or all of the pictures in your PowerPoint file using Compress Pictures. You lot may want to try this with 1 picture at a time to be certain you are satisfied with the result after compression.
To compress a picture:
- In Normal View, brandish the slide with the epitome or movie you want to compress. You can't compress shapes that describe in PowerPoint.
- Select the epitome or picture on the slide. You tin Shift-click multiple images if they are on the same slide.
- Click the Picture Tools Format or Picture Format tab in the Ribbon.
- In the Adjust grouping, click Shrink Pictures. A dialog box appears.
- Select the bank check box to Utilize only to this picture if you lot want to shrink but the current picture or uncheck this pick if you want to compress all pictures in the presentation.
- Select the check box to Delete cropped areas of pictures if you have cropped images and want to permanently delete the areas yous have removed by cropping.
- Choose the desired document resolution.
- Click OK.
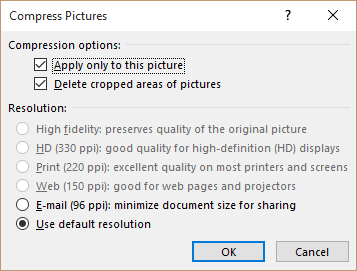

Select the target output resolution that is most advisable for the way y'all desire to utilize the file. Select Electronic mail (96 ppi) for maximum pinch. Apply Spider web (150 ppi) if you programme to post your presentation online or projection it. Cull Impress (220 ppi) if y'all intend to print. HD options (such as 330 ppi) are available in newer versions for high-definition displays.
If a picture has already been compressed, higher-resolution compression options may non be available. For instance, if you've saved a presentation and the default 220 ppi compression in PowerPoint options is set up, you lot won't be able to shrink an prototype again using 330 ppi (HD). Apply Document Resolution refers to the resolution specified the Ready Upwards Slide Show settings on the Slide Testify tab . Unremarkably, this resolution is the same as your estimator screen.
Images that are downloaded from the internet may already be compressed so higher-resolution pinch options may not be available for an image. Also, although PowerPoint will let you lot specify compression settings for CMYK images, it won't actually shrink them.
Don't forget to check pictures in Slide Master View (click the View tab in the Ribbon then click Slide Master) as you may desire to compress those images likewise.
2. Compress pictures when saving a PowerPoint file
You can too compress all images when you save a PowerPoint file.
To relieve a PowerPoint file and compress images:
- Click the File tab in the Ribbon.
- Choose Save As. If necessary, click Options or More Options. A dialog box appears.
- Navigate to the desired location and proper name the file with a different name (such as OurServices2).
- Click Tools. A drop-down bill of fare appears.
- Click Compress Pictures. A dialog box appears.
- Select the desired resolution.
- Click OK.
- Click Save.
3. Change default compression settings in PowerPoint Options
PowerPoint compresses pictures by default based on settings in PowerPoint Options. If you set the default to a lower resolution, this should reduce file size. It's important to note that the compression settings are applied when you lot save the PowerPoint presentation and but for the current file.
To change automatic pinch settings:
- Click the File tab in the Ribbon.
- Click Options. A dialog box appears.
- In the categories on the left, click Advanced.
- In the Epitome Size and Quality settings, choose an option for Default resolution. If you turn off pinch completely, your file size would not exist compressed.
- Click OK.
Below is the PowerPoint Options dialog box with resolution settings in 365 (resolutions are dissimilar depending on version):
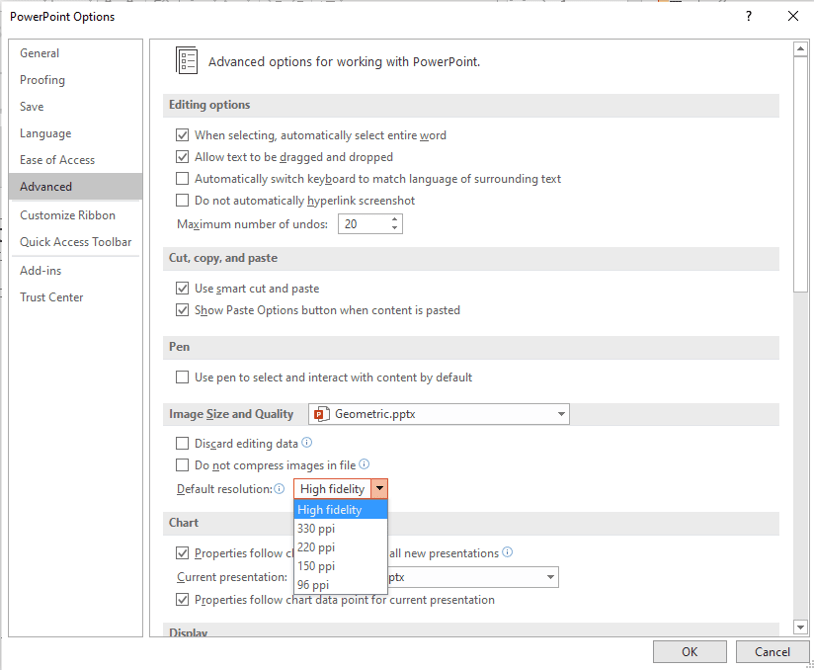
Higher resolution options are non available in older versions of PowerPoint. Yous can change the automatic picture pinch for the current file simply and so information technology's best to change compression settings when y'all starting time create a PowerPoint file.
four. Insert pictures instead of copying and pasting
It's all-time to insert pictures, rather than copying and pasting (or dragging and dropping) into the PowerPoint file. When you copy and paste (or drag and drib) an prototype into a presentation, it can lose compression, modify file blazon and besides bring in other data that can increase file size.
To insert a picture onto a PowerPoint slide:
- In Normal View, display the slide where you want to insert a motion picture.
- Click the Insert tab in the Ribbon and click Pictures (2013 and later versions) or Pic (2010). You can as well click the Pictures or Moving picture icon in a placeholder on a slide. A dialog box appears.
- Navigate to the location of the moving picture.
- Select the picture and click Insert or double-click the picture.
You lot also take the option of linking to a picture file by clicking the arrow abreast Insert in the Insert Pic dialog box and so choosing Link to File. However, the flick is not actually "in" the file (which reduces file size) and if you email the certificate, the pictures will non be included. If y'all employ this strategy, it's best to re-create the flick to the same folder as the PowerPoint presentation and be sure to bring the entire folder with you when you evangelize the presentation.
5. Apply image files at a lower resolution
It's all-time to insert pictures in smaller sizes to reduce the size of your PowerPoint files. For example, if yous are inserting pictures from a stock photograph site, select the everyman resolution possible at the quality level yous require. Information technology you're taking pictures with a phone, salve or transport images at a lower resolution and insert the lower resolution images into your PowerPoint decks
Yous tin can besides open an image in an image editing program (such equally Microsoft Motion picture Manager or Adobe Photoshop) and so salvage it at a lower resolution.
6. Convert images to a different file type
Yous can save pictures in PowerPoint, delete them, and reinsert them into the PowerPoint file. For example, you lot could salve a TIFF (Tagged Epitome File Format) epitome every bit a JPG (Joint Photographic Experts Group) or PNG (Portable Network Graphics) and reduce the size of the image.
To save an image in a dissimilar format and reinsert it into PowerPoint:
- Correct-click the motion picture. A drop-downward card appears.
- Select Save Equally Picture. A dialog box appears.
- Navigate to the binder where you want to save the image.
- Enter a proper name for the file and select a format such every bit JPG or PNG (PNG supports transparent backgrounds).
- Click Salvage.
- In the PowerPoint presentation, delete the original image.
- Click Insert and and so click Motion picture(due south).
- Navigate to the location with the image you saved.
- Double-click the image.
seven. Relieve a copy of images with picture effects
When you lot apply picture effects, including artistic effects, to an prototype, PowerPoint retains 2 copies of the epitome (the original and a copy with the picture furnishings). This allows the user to reset the paradigm but tin significantly increase file size. Compressing pictures likewise doesn't normally have any event on images where you have applied creative effects.
If you have applied picture furnishings (such as blur) to an image, you lot can reduce file size using the following method:
- Right-click the image with the moving picture effect(south). A drib-down menu appears.
- Select Salvage As Film. A dialog box appears.
- Navigate to the folder where you desire to salve the image.
- Enter a name and select a file type (such as JPG or PNG).
- Click Salve.
- In the PowerPoint presentation, delete the image with the film effect(s).
- Click Insert and then click Picture(s).
- Navigate to the location with the epitome yous saved with the artistic result.
- Double-click the image.
8. Replace 3D models with 2d alternatives
In PowerPoint 365, you can insert 3D models which tin can be very large in size. Although 3D models are not inserted as pictures only rather equally 3D models, they are images. 1 model nosotros inserted took 17 MB of space. You lot tin can't compress 3D models like other types of images so you may need to delete them or use a movie instead if file size is an issue.
To supercede a 3D model with a second pic:
- Right-click the 3D model. A drop-down card appears.
- Select Save As Picture. A dialog box appears.
- Navigate to the folder where you desire to relieve the image.
- Enter a name and select a file type (such equally JPG or PNG).
- Click Save.
- In the PowerPoint presentation, delete the 3D model.
- Click Insert and then click Motion-picture show(s).
- Navigate to the location with the image you saved.
- Double-click the prototype.
Below is an case of a 3D prototype saved every bit a flick:
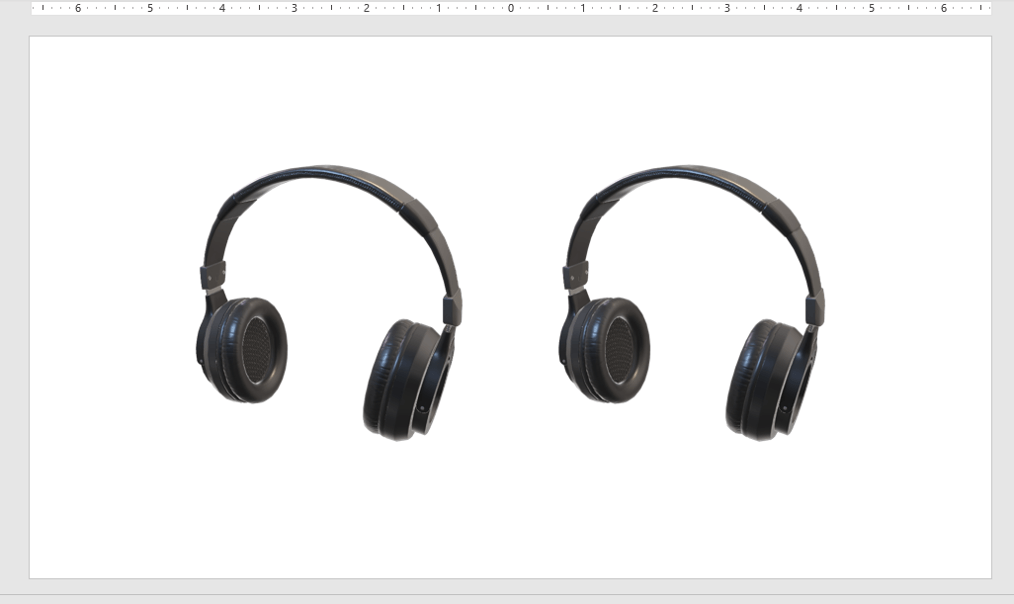
The 3D model is on the left and the epitome on the correct has been saved equally a PNG file and then inserted back into PowerPoint.
Y'all likewise have the culling of cutting the 3D model and pasting information technology dorsum onto the slide every bit a picture.
To replace a 3D model with a 2D picture by cut and pasting:
- Click the 3D model.
- Press Ctrl + X to cutting it.
- Press Ctrl + Alt + Five. The Paste Special dialog box appears.
- Click a picture format (such as JPG, PNG or Enhanced Metafile).
- Click OK.
If you lot utilize either method, you will lose the 3D functionality then you may want to store a copy of the 3D model in some other file (or a copy of the file).
9. Discard editing data
You tin also discard the copy of images that PowerPoint retains if yous want to reset an image.
To discard editing data:
- Click the File tab in the Ribbon.
- Click Options. A dialog box appears.
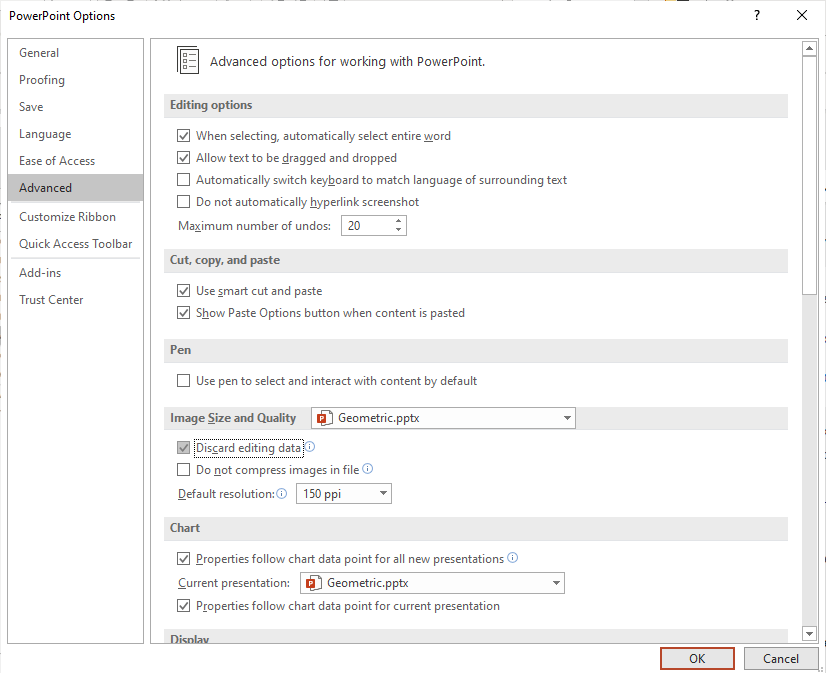
- In the categories on the left, click Advanced.
- In the Image Size and Quality settings, select Discard editing data.
- Click OK.
This setting is applied merely to the current presentation.
Below is the PowerPoint Options dialog box with Discard editing data selected:
x. Link to images
If you are creating presentations for a conference, large company event or a social issue (such every bit a graduation) with hundreds of pictures, you can link to the picture files instead of copying them into your presentation. If you copy hundreds of images into a presentation, PowerPoint may crash if it hits the memory limit for Office so consider linking instead.
To link pictures:
- Click the Insert tab in the Ribbon.
- Click Pic(s).
- Navigate to the location of the picture.
- Click the flick. A dialog box appears.
- On the bottom correct of the dialog box, click the arrow beside Insert.
- Select Link to File.
- Repeat for other pictures.
If you choose to link to images, it's a expert thought to keep the images in a binder in the same binder every bit the presentation and then copy the entire binder if you are going to present on another device.
For more than ways to reduce presentation size, cheque out How to Compress PowerPoint Presentations to Reduce File Size (10 Ways).
Subscribe to get more articles like this one
Did you discover this article helpful? If you would similar to receive new manufactures, join our e-mail list.
More resources
How to Highlight Text with Accent Animation
How to Insert a Check Mark in PowerPoint (4 Ways)
How to Crop an Image Into a Circle in PowerPoint (Ingather to Shape Method)
How to Add together Animation in PowerPoint (Animate Images, Text and Other Objects)
Where to Find Free Pictures for PowerPoint Presentations (ten Great Stock Image Sites)
Related courses
Microsoft PowerPoint: Introduction
Microsoft PowerPoint: Intermediate / Avant-garde
Microsoft PowerPoint: Design for Non-Designers
Microsoft PowerPoint: Animations Bootcamp
VIEW MORE COURSES >
To request this page in an alternate format, contact us.
Our instructor-led courses are delivered in virtual classroom format or at our downtown Toronto location at 1 Yonge Street, Suite 1801 (Toronto Star Building), Toronto, Ontario, Canada (some in-person classroom courses may likewise be delivered at an alternating downtown Toronto location). Contact usa at info@avantixlearning.ca if you'd like to adjust custom onsite training or an online course on a date that'due south convenient for you.
Copyright 2022 Avantix ® Learning
Microsoft, the Microsoft logo, Microsoft Role and related Microsoft applications and logos are registered trademarks of Microsoft Corporation in Canada, United states and other countries. All other trademarks are the property of the registered owners.
Avantix Learning | one Yonge Street, Suite 1801 (Toronto Star Building), Toronto, Ontario, Canada M5E 1W7 | info@avantixlearning.ca
DOWNLOAD HERE
How to Make Pictures Smaller in Powerpoint TUTORIAL
Posted by: idaschism.blogspot.com


Comments
Post a Comment